“The Land That Time Forgot” shows the starry Milky Way arced across a barren horizon. (Nikon D810a, Zeiss 15mm Distagon lens; panorama of eight images for foreground and eight for the sky. Foreground: f/3.5, ISO 1600, 120 seconds; sky: f/2.8, ISO 6400, 15 seconds)
All images: Steve Cullen
Modern digital cameras have truly brought nightscape photography to the masses. What was once the purview of photography’s extreme hobbyists is now within reach for anyone with a relatively contemporary camera — and the gumption to stay awake well into the night snapping pictures. The main tenets of landscape photography — subject matter, composition, and lighting — are also keys to a good nightscape photo. As with landscape photography, the sky won’t necessarily be the hero of your photographs, but it will always be a strong supporting cast member. The quality of the sky can make a difference between an OK photo and one that you’ll proudly share all over Facebook and Instagram. Interestingly, the nemeses of deep-sky astrophotography — clouds, transparency, airglow, and even light pollution — can make for a more compelling backdrop in your nightscapes.
A framework
Before we get into specifics about how to shoot nightscapes, I want to touch on my framework for creating interesting landscape photographs in general. Keep in mind that photography is an art, so you shouldn’t consider these hard and fast rules. Apply them as you see fit. This framework has become second nature in my own work, and I pass them along in my photography workshops. You can remember it by the acronym PATH: Perspective matters; Accentuate a point of interest; Take the viewer into the scene; and Harmonize the composition.
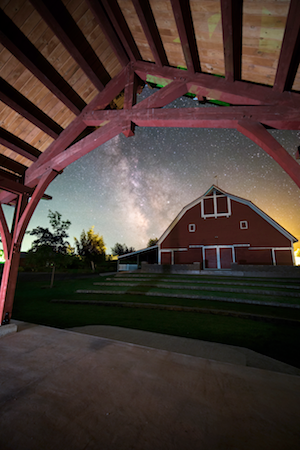
To demonstrate the technique called frame within a frame, the author shot this red barn (and the much more distant Milky Way) through a pavilion. (Nikon D810a, Zeiss 155 Distagon lens; foreground: composite of two images [one lit and the other with just ambient lighting] at f/3.5, ISO 1600, 30 and 120 seconds, respectively; sky: f/2.8, ISO 3200, six 15-second exposures combined)
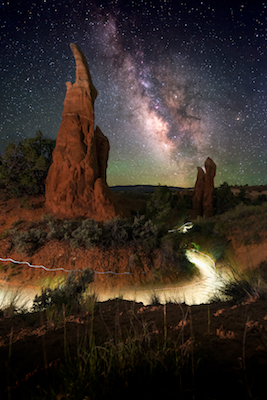
Perspective means considering how you want a viewer to perceive your photograph. Should it be from your point of view, from that of a bug on the ground, or from the vantage point of a bird soaring above? Accentuating a point of interest is about zeroing in on what you want the viewer to clearly see and feel in your composition.All strong photographs take the viewer into the scene, sometimes in a very straightforward way, while others can be a bit more meandering. Techniques to help you bring your viewer into your photograph include the “rule of thirds,” “frame within the frame,” “leading lines,” “foreground and depth,” “center and symmetry,” and “diagonals and triangles.” They all are effective, but the first three are the ones you’ll likely use most often.Chances are you have heard about the rule of thirds, which involves breaking a composition up into a 3-by-3 grid. The principle is that your image will be more balanced and pleasing if you place your main subject at one of the intersecting points of a 3-by-3 grid. You can also use the top third or bottom third horizontal line for your horizons. The image at the bottom left on page 53 is an example of both using the bottom right third for the main subject (the crack in the foreground rock) and using the top third line for the horizon.
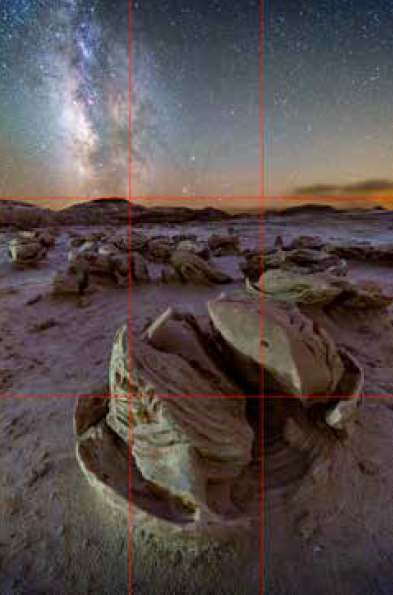
The author superimposed a grid over this photograph to illustrate the rule of thirds.
You might have tried the frame within the frame technique. Often, photographers will use foreground trees or overhanging branches to create a frame around a more distant subject. In the image above, I stood inside a wedding pavilion to create a framing element for the main subject, the old red barn. You’ll notice that the Milky Way is by no means the hero of this shot, but it adds a nice ambiance in the scene.The images captioned below are two examples of leading lines. One has a distinct vertical leading line coming right out of the bottom center of the scene, taking your eye straight to the tree in the distance. Even though it disregards the rule of thirds for the placement of the main element, the overall composition holds true to it, with the horizon falling one-third up from the bottom. The message here is don’t be afraid to break the rules when it helps make your composition stronger!The other image is the meandering variety of leading line. The glow you see is from yours truly running back and forth in the wash with a headlamp held low to the ground at 1 o’clock in the morning. Overall, the composition pulls your eye across and into the scene. Start out trying these techniques, and don’t be afraid to experiment.
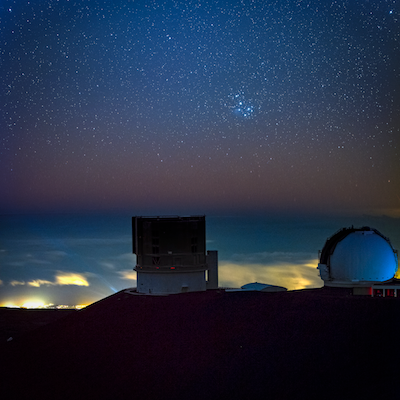
The Subaru Telescope is at the center of this image, with one of the twin W.M. Keck Observatory telescopes at right. Above them, the Pleiades star cluster (M45) creates a focal point. (Nikon D810a, Nikon 70-200mm Nikkor lens set at 70mm; foreground: f/3.5, ISO 1600, 60 seconds; sky: tracked using a Sky Watcher Star Adventurer Tracking Mount and is a composite of six 1-minute exposures at f/2.8 and ISO 3200)
The final piece of the framework is creating harmony in your composition. The best way to describe this is through a variation on Einstein’s quote about simplicity: “Include everything in your composition that needs to be there, and nothing more.”
Into the night
I define nightscape photography as a wonderfully challenging marriage of artistic vision, nocturnal exploration, and technical sophistication — with a dose of sleep deprivation thrown in for good measure. You’ll need an excellent understanding of your gear, the night sky, the locations where you plan to shoot, and how you’ll process what you capture.In photography circles, it is said that better gear doesn’t make you a better photographer. That isn’t necessarily the case with nightscape photography. While better gear will not help you compose your shots more expertly, it can improve the quality of your photographs. From a camera perspective, you’ll want to use a body that accepts interchangeable lenses. Generally, you will not use a focal length longer than 24mm, but it is nice to have options. Two other features to look for when selecting a camera are excellent dynamic range and relatively low noise at high ISOs (virtual film speeds). Regarding lenses, pick an f/2.8 or faster lens with low distortion.
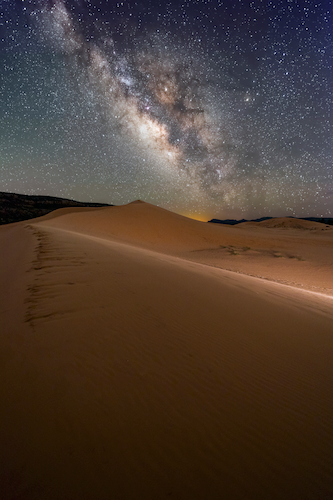
The author titled this shot “The Sands of Time.” He liked the angled Milky Way and used it as a design element. (Nikon D810a, Zeiss 15mm Distagon lens; foreground: f/3.5, ISO 1600, 120 seconds; sky: f/2.8, ISO 3200, six 15-second exposures combined)
All optics have some distortion, including spherical aberration, chromatic aberration, and coma. The biggest struggle starting out in nightscape photography is making the trade-offs between quality (low noise, pinpoint stars, and sharp images, for example) and light-gathering power. With nightscapes, you will be using settings that bring out the worst in your lenses because you want the camera to capture light quickly. To give yourself the best opportunity for high-quality results, you’ll want lenses that have the least amount of distortions when used wide open.Continuing with important gear, a sturdy tripod with an easy-to-manipulate ball head is a must. If you’ll be doing a lot of hiking with your tripod, choose the carbon fiber variety because they are lightweight yet ultrastrong. Finally, you’ll want a remote trigger or intervalometer to open your camera’s shutter so you don’t have to touch the camera.
The burning question
And now, the answer to the question that’s been on your mind, and the one I get asked everywhere I go: What settings do I use to take a nightscape?
The image shows a meandering leading line.
To answer that question, we must ask another one first: What kind of nightscape will you be shooting? For brevity, I’m going to focus on the most basic nightscape, a single exposure. Stacked images, panoramic, and long-focal-length nightscapes involve another level of technical complexity around topics like image registration, masking, nodal points, parallax, stitching, and tracking hardware. It would take quite a few more pages to cover them all adequately.Earlier, I talked about the trade-offs in nightscapes between image quality and light gathering. When deciding on your camera settings, this is where the rubber meets the road. If you want lower noise (less grainy images), use a lower ISO value. Unfortunately, this comes at the expense of light gathering.If you want better details, especially sharper stars at the edges of your images (less coma), close down your lens a few f-stops from wide open. But again, this comes at the expense of light gathering. Likewise, if you want more pinpoint stars across your entire field of view, you must shorten your shutter speed.
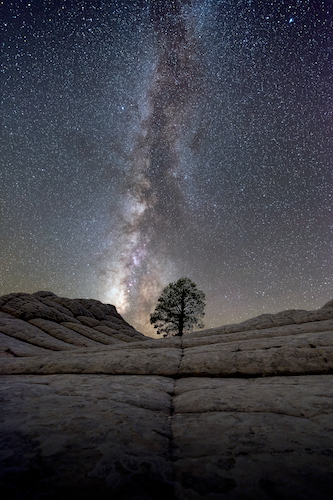
This image shows a vertical leading line.
Before getting down to brass tacks on the settings for a single exposure, there’s one critical thing to address: Don’t forget to focus! Focusing nightscapes can be a challenge because you are working with a wide field of view and almost no light. Most autofocusing systems fail in darkness. They won’t give good results, so turn off autofocus and get good at focusing manually.Here are two tips for better nighttime focusing. First, focus your camera in daylight. Mark the lens with tape where your infinity focus is sharp. Or, better yet, just tape the focus ring down. Second, use the “live view” mode on your camera if it has one. With live view on, rack your focuser all the way out to get to rough infinity focus. Point your camera at a bright star and then zoom into it. Gently move the focus in and out until the star becomes as tight as possible. You can tell when you’ve reached excellent focus because even the faint background stars will “pop” into view.Now you’re ready to take a nightscape. The best way to start is to go all-in on light gathering and see your results. From there, you can experiment with aperture, ISO, and shutter speed. Start by opening your shutter all the way. Crank up your ISO — try 6400 or even higher. Apply the “500 Rule” for your shutter speed: Divide 500 by your lens’ focal length, and the result is a decent estimate of how long you can keep your shutter open before stars will show trails. Take a few shots. Change your settings. Take some more shots. Don’t be afraid to experiment; you probably have plenty of room on your memory card. Test out all sorts of values. When you get back to your computer, take the time to evaluate what works best for your camera and for your personal taste.
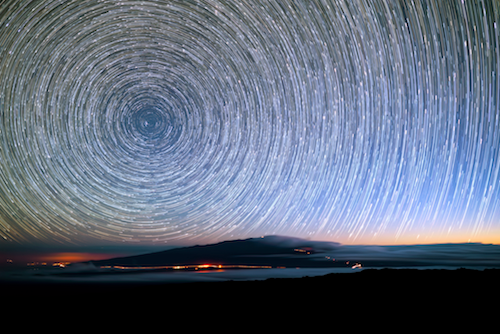
This image of star trails includes a perfectly focused horizon with clouds and automobile lights. (Sony A7S, Zeiss 25mm Batis lens; f/2.8, ISO 3200, one hundred twenty 30-second exposures combined)
Regarding the computer, I would highly recommend that you use Adobe Lightroom for organizing, evaluating, and editing your images. Keep in mind that all nightscapes will have some noise, some distortion, and probably a bit of star trailing. While I won’t cover them now, rest assured there are advanced techniques, such as image stacking and focus stacking, that can dramatically improve the noise signature and edge-to-edge sharpness in your nightscapes.Early on, your goal should be to decide what is acceptable to you. As you gain more experience with your artistry, gear, and techniques, you will begin to intuitively set up the camera for the type of shot you are taking. There will be failures; that’s how we learn. I hope, however, that your initial triumphs in capturing nightscapes will keep pushing you to do even better, night after starlit night.