- Single-power finders
- Observing chairs and ladders
- Finder scopes
- Lights and magnifiers
- Storage cases
- Protective scope covers
- Dew removal systems
- Batteries and power supplies
- Focusers
- Fans and SCT coolers
- Clocks
- “Under the telescope”
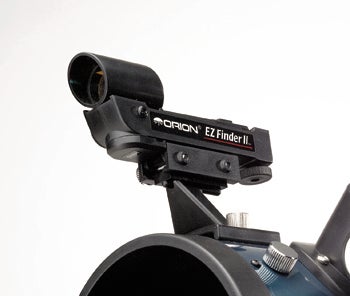
I consider this the first of the essential accessories. Single- (or unity-) power finders are nothing like finder scopes. They are optical devices that do not magnify but enable you to point your telescope toward an object with reasonable accuracy. Single-power finders are real time-savers and simple to use. Just look through them at the sky and move your telescope. Lock down the telescope motions and look through the eyepiece. If you have taken the time to align your finder, the object you want to observe should be in the eyepiece’s field of view.
The major brands of single-power finders I recommend are called “heads-up” displays. When you look through one of these, you see a bulls-eye pattern superimposed on the sky. The diameters of the circles vary from 4° to 0.5°. Your simple goal is to center the object in the smallest circle. Here’s a quick tip: Start with a low-power eyepiece in the telescope to provide a wide field of view.
Your choice of single-power finder depends a lot on your telescope. Some are much larger than others and occupy a correspondingly large footprint on your telescope. Owners of most Schmidt-Cassegrain telescopes and large reflectors won’t find this a problem because the tubes of their telescopes are large enough to accommodate large accessories. I own a 4-inch refractor, however, and some finders are too large for it. Some single-power finders also weigh significantly more than others do. One advantage to some finders is that you can put them in “pulse” mode, where the red circle display flashes at a rate you set. This allows you to see the field of view or object more easily because the display is not on constantly. I set both the pulse and the display brightness to their lowest settings to help preserve my dark adaption.
One more tip: Carry a spare battery for whichever single-power finder you use. These units do not emit much light, so it is very easy to leave them on and inadvertently drain the battery.
Only beginning amateur astronomers overrate comfort while observing. If you’re at all uncomfortable at the telescope, you’ll do less observing, and the observations you make will be less fulfilling and less accurate.
Nothing says comfort like a high-quality observing chair. My definition of “quality” is (1) sturdy construction, (2) a padded seat, and (3) adjustable height. Personally, I don’t like the “piano stool” type of chair because it has no back support, something this observer craves during a long night at the telescope. Plans exist for building observing chairs that incorporate the above quality points at less cost than manufactured observing chairs.
For large Dobsonian-mounted telescopes, observing chairs simply will not do. Even a 12-inch Dobsonian pointed toward the zenith places the eyepiece too high for the observer to look through when seated in an observing chair. In such cases, a step-stool or ladder must be employed.
If you use a ladder, ways exist to make using them more comfortable. If your ladder or step-stand has a metal frame, cut to length a piece of water pipe insulation and cover the top bar where your hands rest. You’ll thank me during your next cold-weather observing session. Fasten carpeting to the steps of the ladder to make standing on them just a bit more comfy. Make certain the carpeting does not overhang the steps. Fasten it with strong tape, a carpenter’s adhesive, or small, round head bolts with washers. If using bolts, I suggest you place them as near to the left and right edges of each of the steps as possible, so you aren’t standing on them for minutes at a time.
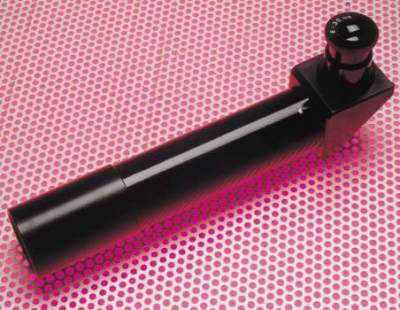
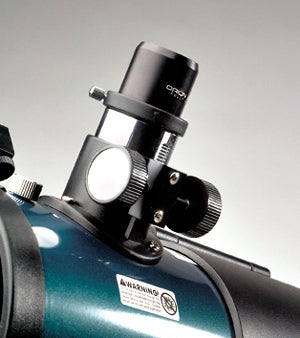
The best telescope in the world is useless if you can’t find anything with it. Therefore, you will need a quality finder scope. Finder scopes come in two optical configurations. The first is the straight-through type, and the other is the right-angle finder.
The straight-through finder inverts (flips) the image, but it does have the advantage of allowing you to site down the main telescope tube, a position that’s intuitive for most amateurs. Most right-angle finders keep the field of view correctly oriented, but looking “at the telescope” trying to find objects is difficult for some people.
An option available with some finder scopes is an illuminated reticle (more often than not using light from a red LED), which makes the crosshairs easier to see. This feature is desirable, but be certain the reticle is dimmable.
Don’t even consider buying a small finder. Purchase one that has a front lens at least 2 inches (50mm) in diameter. Such a finder will let enough light in so you will not become totally frustrated trying to locate fainter objects. As to the magnification of the finder, choose 7x, 8x, or 9x. You can purchase quality finder scopes from the same vendors who sell quality telescopes.
Three final tips: First, buy a finder scope with a mount that has two support rings and six adjustment screws, rather than a mount with one ring and three adjustment screws. The former arrangement is more secure and easier to align. Second, once you have purchased your finder, take the time to align it with your telescope. If you’re traveling to observe and not simply setting your telescope up in the backyard, you’ll probably want to align the finder prior to each session. Finally, align your finder with your telescope during the day. Daytime alignment is easier because a lot more light is available and because the distant objects you’ll be using to align your optics won’t be moving (like the stars do).
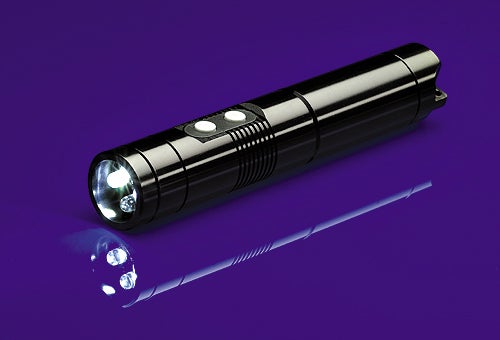
If you plan to use a star chart or book while observing, you’ll need light. Red light is best because it affects your dark adaption least. I don’t suggest you take an ordinary flashlight and wrap a piece of red cellophane around the lighted end. A bright light, even if it’s red, will draw the ire of observers around you and will not maintain your night vision. I do suggest you purchase a flashlight that is adjustable in brightness. As your progress further into amateur astronomy, you will find that the amount of light you use for viewing star charts, etc., diminishes greatly. Simply put, brighter light means you see less at the telescope because your eyes take longer to re-adapt to the darkness.
For those observers advanced in years (like me), the small print on star charts can be difficult to read under low illumination. Inexperienced observers search out brighter lights. Experienced observers use a magnifier. This allows you to use a red light at or near its lowest brightness level. I also suggest using a non-illuminated magnifier. The light source used in some illuminated magnifiers is not very red, not adjustable, and far too bright — bright enough, in fact, to illuminate the white handle of the magnifier by light being transmitted through the plastic.
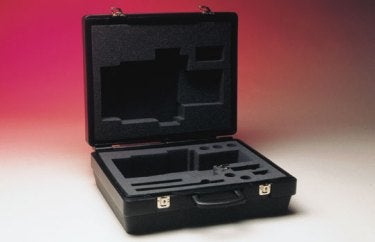
As quality optical equipment, eyepieces and filters must be treated with care. Not doing so invites dirt, scratches, dents, or worse. Most observers eventually acquire one or more of some type of foam-padded storage case. These cases come in many different designs and colors, but all have certain common characteristics.
A good storage case will be sturdy and have high-quality hardware. It will be able to survive the occasional minor ding, drop, or fall with minimum damage to the case itself and NO damage to the contents. Such cases are sealed to dust, and some are even watertight. The insides of quality cases are all foam-filled. Most manufacturers use a foam in the form of pre-cut (although not quite all the way through) cubes. To use, simply figure out what size “hole” your equipment will need and remove just enough of the cubes. Remember, you can always remove more cubes. For larger objects, removing one fewer cube than necessary provides a tighter fit. Here’s a tip: Whether or not your eyepieces are stored in a foam-lined case, always keep the plastic covers on them.
If you are going to be attending an extended star party and have chosen not to tear down and set up every day, you’ll need something to cover your telescope. Mother Nature can be a harsh taskmaster. In the spring and summer, severe dust storms may occur in the southwestern deserts, and thunderstorms may happen at any location. Furthermore, the Sun itself can be an enemy, baking your telescope until it becomes nearly untouchable while heating the mirror so stable images are not produced until hours after sunset, if at all. A proper telescope cover — when secured with elastic or bungee-style cords — should keep out dust and rain, and also reflect sunlight to such a degree that the cool-down time when the scope is uncovered is short.
Dew forms on optics because the temperature of your telescope has fallen below the dew point (the temperature at which atmospheric water vapor condenses on an object). Dew shields, installed at the front of telescopes, are a good idea but will not stop dew from forming under harsh conditions.
Of all telescope designs, probably the most plagued by dew are the Schmidt-Cassegrains, employing, as they do, a large glass corrector plate at the front end of the telescope tube. But refractors and reflectors are certainly not immune, not to mention eyepieces and finder scopes. To prevent the formation of dew, the telescope’s optics must be brought to a higher temperature than the dew point.
If you notice dew forming on your scope, there are a number of ways to deal with it: (1) Bring the telescope indoors to warm up. I realize this is often impractical or downright impossible. (2) In the field, you can turn on your automobile’s heater and move the affected part inside to warm up. In both of these cases, leave all optics uncovered so the dew can evaporate directly to the air. (3) Use a portable hair dryer (set at the lowest air volume) to warm your optics. Automotive supply stores often sell such units, which operate from the direct current of a car battery. (4) Purchase a dew removal system that installs directly onto your telescope. Several systems are available, but the two best known are the Kendrick Dew Removal System and the Orion Dew Zapper. The Orion system may be found on their web site at www.telescope.com. The Kendrick system is available through many quality telescope supply dealers.
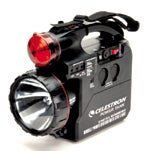
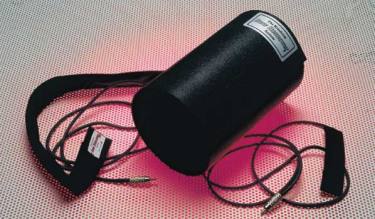
If you observe only from one location, and if that location has alternating current power, consider yourself a lucky person. For the other 99 percent of us, some form of portable power is essential. Several options exist; the most popular is hooking your equipment directly to your automobile battery. If you’re doing this while observing alone, remember to start your car several times during the night to recharge its battery.
Another option is to purchase a separate, dedicated power supply. Some recently introduced models have plenty of power for several all-night observing sessions. Some also include emergency features such as a white spotlight. Use that feature with care when observing with others!
A chain is only as strong as its weakest link. For some telescope systems, the weakest link is the focuser. Before discussing features and usefulness, I want you to know that quality focusers are not cheap. Selecting one is not trivial, and the installation, although simple for the most part, can be daunting. Once you use one of these elite focusers, however, you’ll learn not to compromise quality for cost. The two main types of focusers are the rack and pinion, in which a small gear drives the tube that holds the eyepiece, and the Crayford design, in which the drawtube rides on small bearings.
Of course, all focusers should hold your valuable eyepieces securely in place, irrelevant of the telescope’s position. Knurled machine screws accomplish this; they apply tension to the eyepiece. Creating tension can be done directly by the point of the screw or, as in some designs, by a secondary mechanism upon which the screw tightens. Observers who claim that direct contact by the screw may damage the eyepiece barrel prefer this latter method.
Quality focusers also eliminate backlash, which occurs if there is looseness or “play” in the focusing mechanism when the direction of focus is changed. It’s not a serious problem, but it is an annoying one.
Focusers should be well machined with no sharp edges. They should provide plenty of in-and-out travel to accommodate all your eyepieces. Many focusers provide a mechanism that allows you to adjust the “tightness” as you turn the focuser. A nice feature of some focusers is a two-speed focusing mechanism. The “coarse” focusing knob is for quickly establishing a near-focus position; you then switch to the “fine” knob to obtain a sharp image. I recommend choosing a focuser with this feature.
Some focusers incorporate motor control, and a few even have a digital readout that allows you to return exactly to a previous focus setting. If you are contemplating the purchase of a top-of-the-line motor-driven focuser, make sure it’s geared correctly for your use. Some motorized focusers, such as those intended for CCD work, are geared to such an extent that they are impossible to use visually. Finally, purchase a focuser which will accommodate both 2″ and 1¼” eyepieces.
The glass used to make mirrors for reflecting telescopes can absorb a great deal of heat during the day. The release of this heat after sundown creates thermal air currents that distort the image seen through the telescope. Some amateur astronomers have added cooling fans to their telescopes to combat this. The fans gently draw air through the telescope to negate any thermal effects. Usually, the fans are of the low-air flow, whisper type and are located underneath the primary mirror (the main source of heat absorption). Most of these fans operate on low-voltage direct current, which is easily transportable.
A similar device is available for Schmidt-Cassegrain telescopes (SCTs). Called the CosmicOne SCT Cooler, it was invented by Robert Haler of Lymax Astronomy in Independence, Missouri. The SCT Cooler is a device for ventilating the inside of Schmidt-Cassegrain telescopes. This minimizes image-ruining tube currents and heat pillars in 10-20 minutes instead of the usual 45 minutes to 2 hours. The greater the temperature difference between the place your telescope is stored and the outside evening air, the more quality viewing time you can reclaim with the SCT Cooler. The SCT Cooler has a filtered air intake that minimizes the possibility of dust infiltration and directs the air flow away from the internal optical surfaces.
To use the SCT Cooler, just unscrew the eyepiece holder from the back of your Celestron or Meade SCT and carefully insert the cooler. Turn it on, and in a short while, you’ll be observing with a cooled telescope. Find the CosmicOne SCT Cooler on the Internet at www.lymax.com.
When recording an astronomical observation, knowing the correct time is essential. A recently set wristwatch can do this. Other options also exist.
If you have alternating current available, use a clock with large, red numbers. You can set it to either local time or Universal Time, depending on your preference, but be sure to note which time when you’re making your observing log entry.
For critical observations when your eye must be continuously at the eyepiece, a short-wave radio tuned to one of the standard time frequencies can provide a highly accurate time source. In America, the National Institute of Standards and Technology operates radio station WWV at frequencies of 2.5, 5, 10, 15, and 20 MHz. Although each frequency carries the same information, multiple frequencies are used because the quality of reception depends on factors such as location, time of year, time of day, the frequency being used, and atmospheric conditions. The variety of frequencies makes it likely that at least one frequency will be usable at all times.
In addition to short-wave radios, a few observers use “talking clocks.” The best of these may be found in stores that carry items specifically for the blind. These clocks have better speech quality than items in general stores and also come in a variety of languages. Such clocks speak the time when a large button is touched.
Believe it or not, what you walk on while observing can significantly add to or subtract from your experience. At star parties, I’ve experienced many different types of “flooring” for telescopes. One observer I know likes to put a layer of straw several centimeters thick beneath his telescope. This works fairly well when it is humid and not windy. After a rain has occurred, there is an advantage in that the top layer of straw dries quickly, leaving your footwear relatively dry. The straw also provides a good barrier between shoes and mud. However, if there is wind, you can imagine how the straw does fly! Also, if the weather is very dry, repeated walking on the straw can create a fine dust.
Other observers use plastic tarps held in place by tent stakes or very large nails. I prefer using tarps with grommets. Such tarps generally exhibit better quality, as they have reinforced edges. I’ve also seen floor protectors, such as the ones used in offices under desk chairs, used as temporary flooring for observing.
Carpeting or plastic turf also appears at star parties. If you’re planning on using carpeting, it should be a synthetic blend, as other types can absorb moisture, and that can be a less than pleasant experience.
The finest “flooring” I have used around any telescope was a plastic turf with a very loose weave, approximately ½” (1 centimeter) thick. It allowed water to pass through and did not absorb any. The best thing about it, however, was that it was slightly springy to walk on, providing somewhat of a cushion that really made a difference in the way my feet felt by the end of the night. At the end of the observing run, this floor simply rolls up, but it is thick, so you might need some extra storage and transportation space. Cleaning this material also is easy. Simply lay it out on a cement driveway or patio and rinse it off with a garden hose.