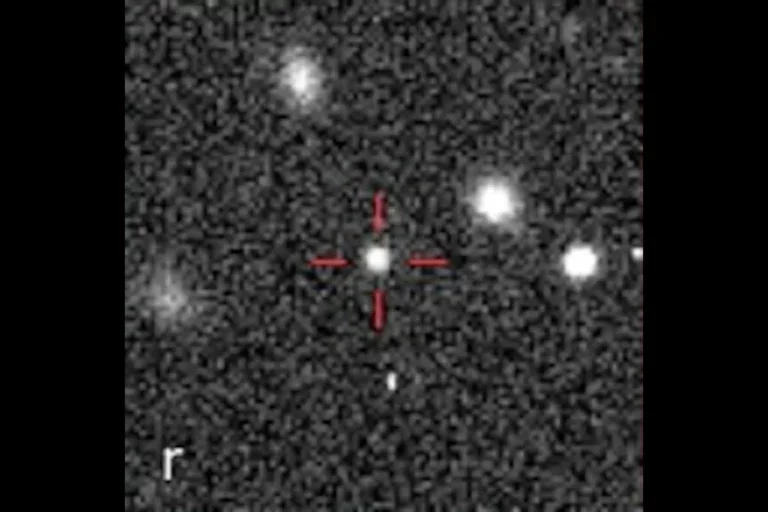
Unlike most astronomical targets, comets move quickly. This apparent speed can make both the acquisition and processing of the data challenging. In this column, I’ll describe how to create composite images of comets that appear as snapshots without smeared stars or blurred cometary details.
Indeed, a single exposure is the most desirable way to acquire the data. One long exposure, however, is generally not adequate to capture the faintest and most exciting part of a comet — its tail. This issue becomes even more challenging because monochrome cameras require exposures through red, green, and blue filters.
The way to avoid these issues is to take multiple exposures of the comet. Each should be as long as possible without showing significant comet trailing. Separate each exposure by the amount of time necessary for the comet to move 10 or more pixels. For focal lengths between 500 and 4,000 millimeters, this works out to be between four and 10 minutes. This technique works for one-shot color cameras as well as tri-color imagery.
Maximize the length of the base exposures of the comet, but don’t introduce trailing, which I judge as being more than five pixels. Of course, ultimately this depends on the motion of the comet, but using the numbers above, try times from two to five minutes.
To acquire tri-color data, expose the comet while cycling the filters among red, green, and blue. By capturing images this way, each time you take a red picture, the comet will have moved the required 10 pixels before you take the next red shot. Put a delay between exposures if necessary.
Once you calibrate all of the exposures with darks and flats, you should register and combine the data set in two different ways. First, align the images using the stars. Before averaging the images, use a strong rejection algorithm, such as the “Poisson Rejection” feature in CCDStack. And here’s a tip: Standard processing requires that you normalize the data before you do any form of rejection. Programs vary as to how this is done, but you must do it to get the best results.
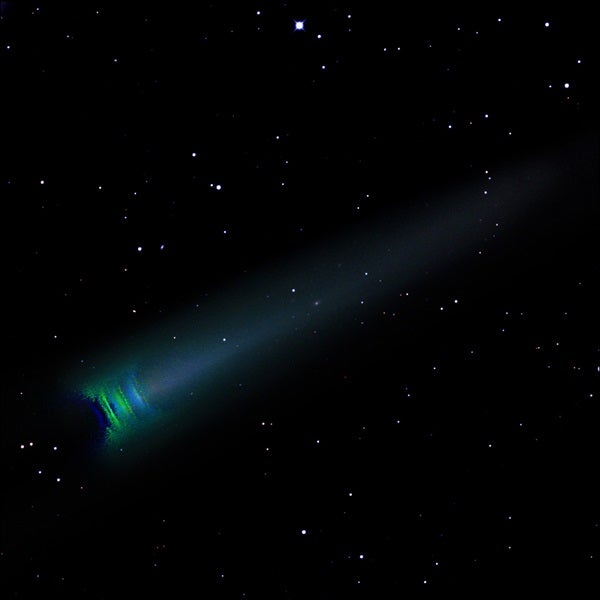
At this point, you’ll have an image with stars and a faded, mostly rejected comet. Then, with the same initial data, align on only the comet. This time when you combine the image using the algorithm, only the comet will remain and the stars will disappear. Even combining the data with the “Median” setting will work, but you’ll get a better signal-to-noise ratio using a more robust rejection technique that averages values after removing outliers.
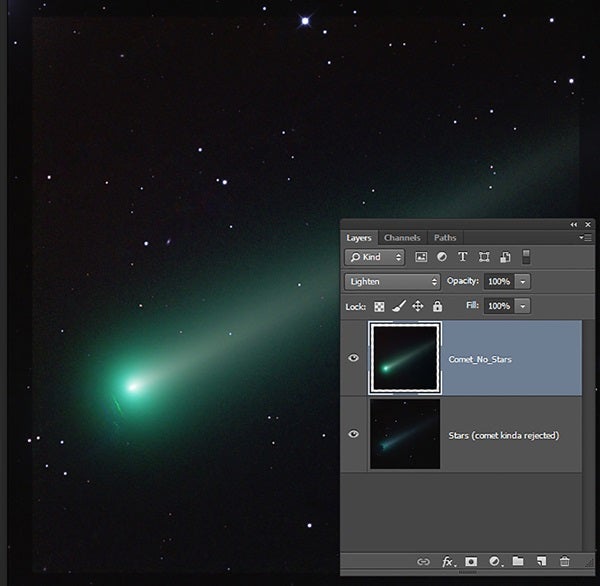
Once you create these two images, bring them into Photoshop as two layers and blend them together. Regarding the image of the star field with a faded comet, it is possible to remove or further fade the parts of the comet still visible.
Then, blend the layers using the “Lighten” blending mode. The comet layer (the one with no stars) will overlay on the star layer. Raise the black level and make the sky dark in the comet layer so the sky values don’t add to the image but only the comet is visible.
At this point, you should be close to the goal of a composite image. There may still be discontinuities between the two images. If so, often a simple mask with a strongly blurred edge on the comet layer will make artifacts nearly invisible.