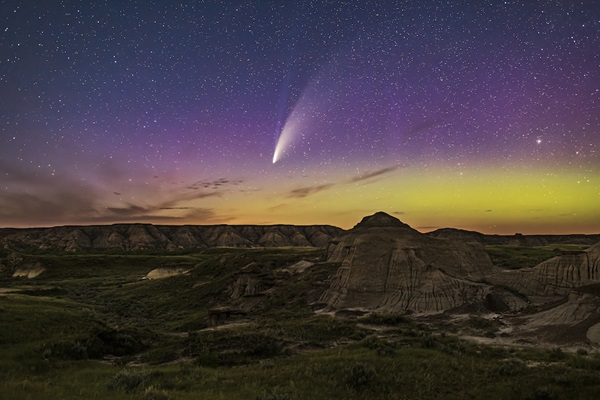
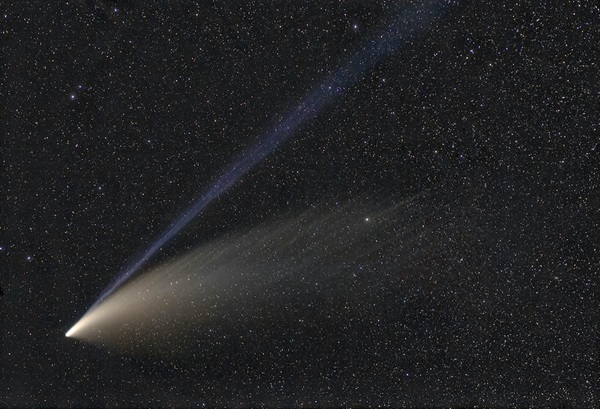
Over the last few years, we have been fortunate to be treated to several dramatic comets gracing our skies. Comets C/2020 F3 (NEOWISE) and C/2021 A1 (Leonard) were both wonderful objects to observe and image, with NEOWISE being one of the most impressive naked-eye comets of the 21st century.
And now, a new comet is gracing our skies: Comet C/2023 A3 (Tsuchinshan-ATLAS), which is rising higher every evening as a naked-eye comet.
RELATED: Here’s where to see the comet of the year as it rises in the evening sky
The timing of recent comets couldn’t be better from an imaging standpoint, either. Since their introduction decades ago, digital cameras have grown steadily in popularity and prevalence, so that nearly every amateur astronomer now has one — and the accompanying improvements in light sensitivity has made image processing easier than ever before. Plus, thanks to smartphones, pretty much everyone is equipped with a camera that is good enough to catch shots of these brief visitors from the outskirts of our solar system.
Dirty snowballs
Before you plan your composition and set up your equipment, you might be wondering what features you should be on the lookout for.
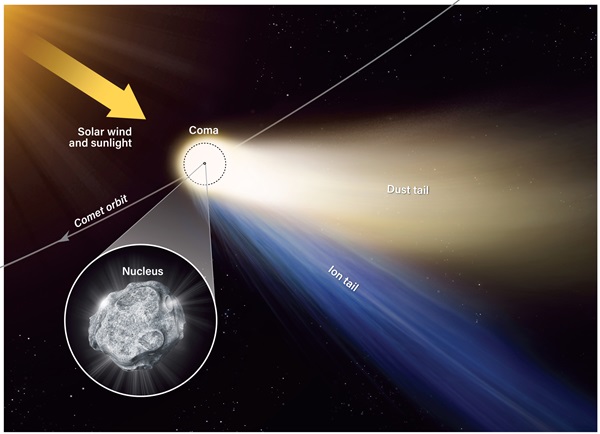
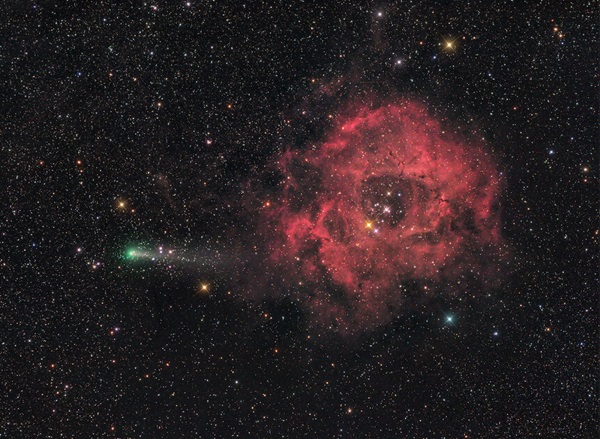
Comets are small bodies of ice, rock, dust, and frozen gases which astronomers think originate from the distant reaches of our solar system. As these bodies slowly draw closer to the Sun, solar heating causes volatile materials within to vaporize. This blows dust away from the comet’s nucleus, forming a large, tenuous atmosphere around it called a coma.
Pressure from solar radiation and the solar wind then shapes this coma into a tail of dusty material pointing away from the Sun. This dust tail is sometimes visible to us on Earth because it reflects sunlight. And occasionally, a second tail can form from the gases that are released by the comet. This is often called the gas tail or ion tail, which glows not due to solar illumination but ionization.
Material from the dust tail escapes the comet’s gravitational grasp, spreading out behind the comet along its orbital path, often taking on a curved shape. Meanwhile, the ion tail, which is more strongly affected by the solar wind, always points directly away from the Sun. An ion tail typically presents a notable bluish color, in stark contrast to the hazy white hue of a dust tail.
If it’s a bright comet, there might even be a third tail called the anti-tail. This tail can be seen emanating from the nucleus and seemingly pointing toward the Sun. However, this is an optical illusion that can appear as Earth crosses the plane of the comet’s orbit when the body is close to the Sun. When viewed from edge-on, the thin sheet of cometary dust lagging behind the comet looks like a sunward pointing spike.
Comets typically come in two main flavors: short- and long-period. Short-period comets circle the Sun in less than approximately 200 years, while long-period ones can take thousands to millions of years to complete a single orbit.
There also exists a third type of comet, known as a sungrazer. This special class is responsible for many of the most spectacular comets seen throughout history. Sungrazers are characterized by very small perihelion distances — meaning they pass extremely close to the Sun — which can make them appear spectacularly bright for a brief period.
Many great comets throughout history were sungrazers, including C/1965 S1 (Ikeya-Seki), C/1975 V1 (West), and C/2006 P1 (McNaught). More recently, in 2013, Comet C/2012 S1 (ISON) came within about 730,000 miles (1.2 million km) of the Sun. Before its approach, giddy observers dubbed it the “comet of the century.” Unfortunately, ISON disintegrated shortly after its perihelion pass and never lived up to its dazzling expectations. But that’s the frustrating thing about comets that you simply have to live with: You never quite know what you’re going to see!
DSLR photography
Unlike many forms of astrophotography, which can be quite costly and complex, shooting bright comets is a surprisingly straightforward yet greatly rewarding pursuit. Keeping a few simple points in mind, anyone with a quality camera can easily capture spectacular images of these stunning celestial bodies.
For bright comets, which we will define here as those visible to the naked eye, a digital SLR equipped with a standard 18–55mm lens and mounted on a sturdy tripod will suffice. First, set the camera to operate in “M” (manual) mode, giving you full control over the camera settings. Carefully focus the camera on a bright star, the Moon (if available), or even the comet itself, if it’s bright enough for the autofocus to latch onto it. Most DSLRs today are equipped with a “live view” mode that allows you to focus the lens using a magnified real-time view through the camera’s LCD display. This feature is extremely useful for easy, accurate focusing.
Next, you’ll want to set the lens aperture to its widest value, or lowest f-number. You’ll also want to set the ISO sensitivity to around 400 to 800 for bright comets. For fainter comets, you might get better results with a higher ISO, somewhere in the 1600 to 3200 range. Keep in mind, however, higher ISOs lead to noisier images.
A sturdy tripod is a must for any form of astrophotography. You also might want a remote release so that you can trigger the camera shutter without having to touch it and risk blurring the image. However, DSLRs have various time-delay modes; so you can physically press the shutter-release button, and then the camera will wait a few seconds before opening the shutter for a set amount of time. I have used this mode on many occasions with great success.
Once you begin taking images of your comet, experiment with different exposure times. Your ideal exposure time will depend on your camera, how bright the comet is, and how bright your local sky is. In general, however, you will always want to keep your single exposures to around 15 seconds or less to avoid star trails. The higher the focal length of your lens, the shorter exposure time you’ll need to use to avoid trailing. You can also combat trailing by attaching your camera to a small driven mount, but that might not be an option for everyone. And, of course, maybe you want star trails in your shot!
Although it takes a bit more work, the best way to truly capture the beauty of comets is to take a series of shots and then stack them together to enhance details and reduce background noise, especially if using higher ISO settings. There are many programs available that allow you to easily stack images. The planetary image-processing program RegiStax will do a good job stacking images from DSLR cameras, and it’s also very easy to use. DeepSkyStacker also works well, and both programs are free to download.
Imaging through a scope
A telescope opens up a whole range of fainter comets for imaging, not just those rare and spectacular naked-eye sights. At any one time, there can be hundreds of dim comets within reach of an amateur scope mounted with a high-quality camera. Although most are likely too faint to be worth capturing, often, there are several gracing the sky at once, and they make for excellent targets through small scopes.
Pretty much any telescope can be used to shoot comets. But observers tend to favor fast refractors, Newtonians, and Ritchey-Chrétiens for their wide, flat fields of view and fast f-ratios.
Although DSLRs will still produce good results, many observers opt to use dedicated astronomical CCD cameras, such as those manufactured by companies like SBIG and FLI. These cameras are certainly not cheap, but they do offer the highest image quality. Using dedicated CCD cameras requires the usual methods associated with deep-sky astrophotography, such as using dark frames and flat fields to fully calibrate the images before processing.
Planning your imaging session is especially important when using your telescope. Many comets reach their peak brightness when they are located low in the twilight sky, so time is often limited when it comes to capturing good data.
Quality planetarium software is essential to planning observations, especially for comets. Many software packages are available, such as TheSky, Starry Night, and Cartes du Ciel. Planetarium programs like these allow you to carefully plan out your observing session, helping you maximize your data and, therefore, the quality of your final image.
You’ll also need to update the program’s comet orbital elements using the Minor Planet Center’s ephemerides. (See the “Further Reading” sidebar on the next page.) These are databases that provide the calculated positions of celestial objects; this will ensure the positions of known comets are displayed accurately, as well as add any new comets as they are discovered. These programs also allow you to input your camera and telescope field of view to allow you to better plan out your composition by carefully positioning the comet on the camera sensor for optimal framing.
When imaging most comets through a telescope, you’ll immediately notice that your target moves with respect to the background star field. Some comets move across the sky much faster than others, but usually, any single exposure longer than four to five minutes will result in trailing of the comet itself in your image. The easy solution to this is to take several short exposures, such as five 60-second shots, and then stack them together. This will result in a clean and sharp comet, but it will also leave you with a trailed star field. Nonetheless, this method is the one employed by most telescopic comet observers.
If you want to avoid trails altogether, you can use a more complex image processing routine that combines two different master image stacks: one short-exposure stack showcasing trailless stars and another long-exposure stack that makes the comet really pop.

Remote imaging
Another fantastic way to capture stunning photographs of comets is by using remotely operated telescopes. These telescopes are located under extremely dark skies and are a great option for those stuck under cloudy or light-polluted skies. For a modest fee, you can log onto a telescope online and control it in real time to target the object of your choice. During your slated observation window, you are provided with live views of the sky and weather, you can view images from the telescope as they are captured, and you can download your data in the usual FITS format for processing.
The real benefit here, however, is that this method gives you access to telescopes located at top-tier dark-sky locations, all without leaving the comfort of your own home. Many telescopes, both amateur and professional, are successfully operated in this manner today, and I’ve carried out numerous observations this way.
Several remote observatories ranging in both capability and location are now available to amateurs. Providers such as Chilescope, iTelescope, TelescopeLive, and Slooh all offer a multitude of telescope systems suitable for remotely imaging comets. Another bonus of this approach is that most comets are bright enough that they don’t require lengthy exposures. Since many remote services charge based on exposure time, from a financial perspective, remote comet imaging is quite affordable for most — unlike observing a deep-sky object for multiple hours.
No matter how you choose to capture your next — or first — image of a comet racing across the night sky, don’t forget you’re observing an ancient relic left over from the very formation of our solar system. Throughout history, these beacons have been viewed as both joyous heralds of the gods and dread-inspiring harbingers of doom. But now we know they do not, in fact, signal our fate. That’s in our own hands.
So, next time a comet graces the skies, grab your gear, get outside, and start shooting!
Further reading
Books: Hunting and Imaging Comets (Springer, 2010), by Martin Mobberley
For the Latest comet information: http://www.aerith.net
Minor Planet Center Observable Comets: https://www.minorplanetcenter.net/iau/Ephemerides/Comets
Remote observatory facilities: http://www.chilescope.com; https://www.telescope.live; https://www.itelescope.net
Editor’s note: The illustration showing the shapes of a comet’s ion tail and dust tail has been updated since the print version of this article was released. The original graphic incorrectly labeled the comet’s direction of travel.
Editor’s note: This story was originally published online Jan. 11, 2023. It was updated Oct. 15, 2024, with details of Comet C/2023 A3 (Tsuchinshan-ATLAS).