From the July 2018 issue

Shoot the Sun, Moon, and planets

Surprisingly simple cameras will let you capture the solar system.
By | Published: July 19, 2018 | Last updated on May 18, 2023
ASYLP0711_03b
These images of Mars, taken December 30, 2009, from Coral Gables, Florida, included the description: “Bright terminator cloud south of Meridiani; Clouds over Chryse and Tharsis, S. Limb; ‘Lifesaver Effect’ in NPC; Possible dust streak along western NPC edge.” Such images prove that amateur astronomers using video cameras can record lots of planetary detail.
Donald Parker
In recent years, high-resolution photography of objects within our solar system has gone through a revolution. Imagers no longer use film and try thousands of times to get one lucky shot. Instead, they shoot streams of video and use software to select, align, and stack the sharpest frames, taking advantage of moments of steady air the way a visual observer does. The resulting amateur images are often as good as those taken from professional observatories.

The camera
The traditional video camera used for astroimaging is a low-end webcam with the lens removed and a telescope adapter fitted in its place. Nowadays, you can buy similar cameras ready-made for astronomy. Just like webcams, these cameras do not need cooling or elaborate controls. Their power comes through the USB cable that connects them to the computer.

Amateur astronomers can also choose higher-grade planetary cameras from many vendors. Such units have better sensors, more rugged construction, and more sophisticated control software.

All these cameras fit in a telescope’s focuser and record about the same field of view as a 6mm eyepiece. A 640×480 sensor is big enough because planets — even Jupiter — appear small. You might want a slightly larger sensor in your camera if you plan to use it with a 12-inch or larger telescope, but you won’t need the multiple-megapixel units that are desirable for deep-sky work.

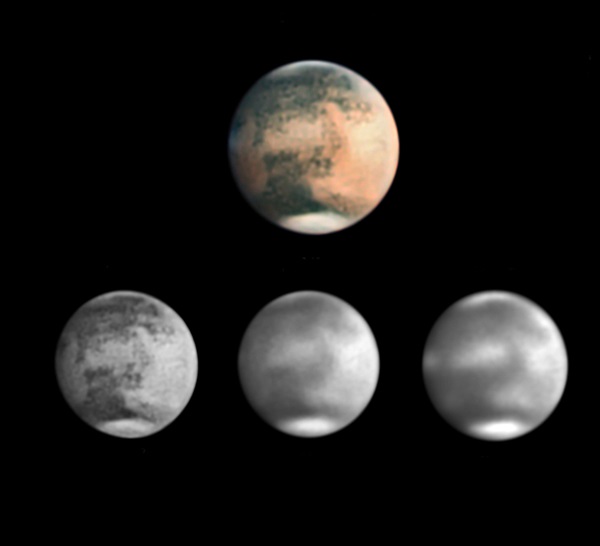
Most of these cameras produce color images the same way a webcam does — using a matrix of pixels sensitive to red, green, and blue light. For higher quality, you can use a monochrome camera and take each picture three times, through red, green, and blue filters.

The Imaging Source offers three basic lines of cameras: monochrome (DMK), color (DFK), and color without an infrared-blocking filter (DBK). The last of these requires a separate infrared-blocking filter to give realistic color images, but you have the alternative of using a visible-light-blocking, infrared-passing filter (deep-red) to take pictures that record infrared (IR) radiation. Some imagers prefer an IR filter because the “seeing” (a measure of the atmosphere’s steadiness above your camera) is often better in infrared than in visible light.

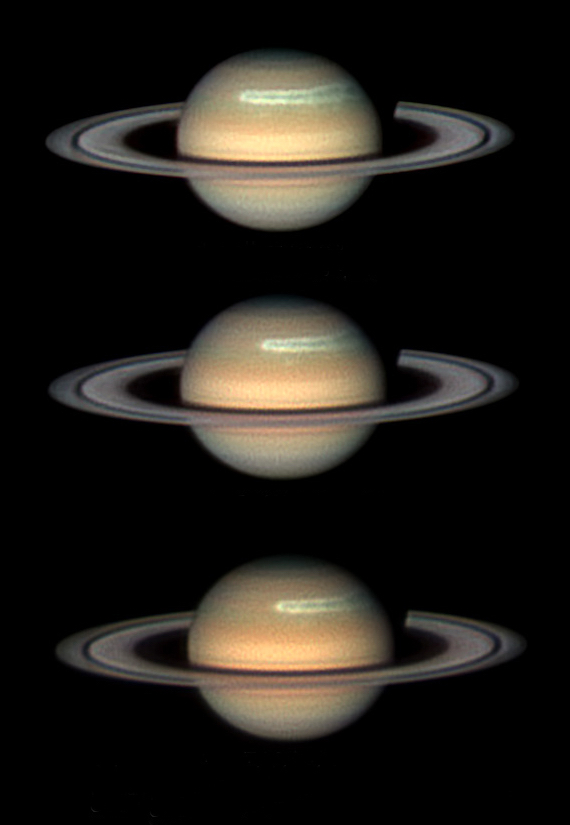
The pixel size of video astrocameras is a good match to the diffraction-limited resolution of a telescope at focal ratios between f/20 and f/30. That means you’ll need at least a 2x Barlow lens with an f/8 or f/10 telescope. With my f/10 Schmidt-Cassegrain, I normally use a 3x Barlow to give f/30. When imaging Saturn, which is not as bright as Jupiter or Mars near opposition, I use a 2x Barlow and work at f/20. That combination produces a brighter but smaller image.

ASYLP0711_01b
To make the color image of Jupiter, the photographer captured the giant planet through red, green, and blue filters, and then combined them into the single image on the right using software. He shot these through an 8-inch Meade LX200 Schmidt-Cassegrain telescope at f/32 and a Lumenera SKYnyx 2-0M CCD camera January 15, 2011, from Tournefeuille, France.
Marc Delcroix
Conditions
The main challenge of planetary observing is atmospheric unsteadiness. Experienced visual observers keep staring at a planet, making the most of brief moments of clarity. The trained observer’s brain also can reconstruct, at least partly, the sharp image that he or she would see if the air were calmer.

Image-processing software also can do both of these things. By selecting and stacking the best video frames, it simulates good seeing. And with other techniques, it can sharpen the image.

Even so, it’s best for the air to be as steady as possible. A slight haze can be good, extremes of hot and cold are bad, and a clear sky is often an unsteady one. Your telescope must be in thermal equilibrium with the air, so leave it outdoors in the shade for a couple of hours before doing critical planetary work.

The immediate surroundings of the telescope also matter. Observing over a cliff is best, over grass is all right, and over hot pavement is unacceptable. Because my permanent pier sits at the end of a driveway, I placed a plastic picnic table just south of it. This blocks the hot air rising from the pavement and improves the view considerably.

I also find that a Kendrick dew heater running at low power helps maintain a steady view in a refractor, even when there is no dew. The reason is that the front lens of the telescope actually gets colder than the surrounding air because of its low thermal conductivity. It therefore radiates heat faster than it can regain it by conduction. Warming the lens slightly to match the air temperature helps keep the image steadier.

ASYLP0711_02b
This Saturn series shows what astronomers call the Northern Electrostatic Disturbance, a huge storm in the ringed planet’s northern hemisphere. The imager used an 11-inch Celestron Schmidt-Cassegrain telescope and a Point Grey Flea3 FireWire CCD camera February 6, 2011, from Cebu, Philippines.
Christopher Go
Exposures and time limits
To get a properly exposed image, you must have the correct integration time, a setting equivalent to shutter speed except that there is no shutter. You can find this by experimentation. As a starting point, assume your video camera’s “speed” is comparable to ISO 400, but expect wide variation. Set the camera’s gain and contrast to the middle of its range unless you’re imaging a faint planet, for which you’d set it in the upper end of its range.

I often have better luck with slightly longer exposures (like 1/10 second) rather than shorter ones, but this depends on atmospheric conditions. Some software includes an auto-exposure feature that works well with planets. If yours doesn’t, set the exposure manually rather than letting the computer take wild guesses. When in doubt, underexpose somewhat because you can restore dim areas by stacking images, but overexposed areas are irrecoverable.
You must also choose the number of frames per second your camera shoots. Typically it’s 15 or 30. Make sure the frames aren’t shorter than the exposures. If you select 30 frames per second and each frame is 1/20 of a second, most of them will record more than once, and the duplication does no good.
You also get to choose the video format, called the codec. The best choice is to record uncompressed or minimally compressed video rather than using heavy compression. For specifics, consult the documentation for your camera and software. Note that Microsoft AVI is not a video format; it’s just a type of “container file” that can contain video encoded many different ways.
ASYLP0711_04
The Moon’s Plato Crater sits on the northern edge of Mare Imbrium. Since its formation some 3.8 billion years ago, meteors have pocked its lava-filled floor with craters. For this shot, the imager used a 14-inch Celestron Schmidt-Cassegrain telescope and a Lumenera SKYnyx 2-0M CCD camera May 26, 2007.
Damian Peach
The planet’s rotational speed limits how much video you can use in your image. A reasonable limit is the time it takes for the planet’s rotation to smear central details by half an arcsecond as seen from Earth. The formula for this is: time (in minutes) =  the planet’s rotational period (in hours) x (60/π) x apparent diameter of planet (in arcseconds).

That works out to about 2.5 minutes for Jupiter, 5 minutes for Saturn, and 15 minutes for Mars. You can see why multi-filter work is popular with Mars but somewhat unfeasible with Jupiter. In practice, you can do a bit better than calculated because software like RegiStax will favor the sharpest part of the picture (usually the center) and will shift the images to leave the best detail there at the expense of blurring the edges. Under poor conditions, record longer because you have less to lose from blurring and more to gain by having more frames to stack and select.
In any case, your goal should be to record anywhere from 1,000 to 5,000 frames of video. With Jupiter, recording 15 frames per second will create 1,800 frames in 2 minutes. Fainter Saturn will probably limit you to 7.5 or 3.75 frames per second, but you can record longer overall sequences, up to 8 minutes.
Mercury and Venus are special cases because they rotate slowly, so you can record for several minutes. Remember that the visible detail in Venus is mainly an ultraviolet (UV) phenomenon. You’ll do best with a monochrome camera and a filter that passes UV light, such as a deep-violet filter.
ASYLP0711_06
The diamond ring blazed during the July 11, 2010, total solar eclipse. As the author suggests, the imager used a camera that captures a much wider field of view than a video astrocamera. He took this shot through a Canon EOS 5D Mark II DSLR with an EF300mm f/2.8L USM lens and a 1.4x extender for an effective focal length of 420mm. He made a 1/1,600-second exposure at f/4.5 and ISO 500.
David Buchla
Processing
Once you have your video, your next task is to process the frames with RegiStax. Several detailed RegiStax tutorials exist on the Internet, so I’ll just summarize the process. The first step is to open the video file and let RegiStax align the video frames. RegiStax sorts the frames in decreasing order of quality and asks you how many you want to keep. I generally keep the best two-thirds of the total.

Next, RegiStax optimizes the alignment by realigning the frames once it has seen the full set. It then stacks them.
Last, you should use the program’s wavelet function to bring out detail by selectively enhancing features of a particular size. If you’ve captured good video, the smallest wavelet filters (1 and 2 pixels wide) will do the most good. You can see the effect of each filter as you adjust it; your goal is to bring out planetary detail but not the camera’s electronic noise.
ASYLP0711_05
A video astrocamera’s small field of view can still cover a prominence at the Sun’s edge. The imager shot our daytime star through a 14-inch Celestron Schmidt-Cassegrain telescope, a Hydrogen-alpha filter, and a Lumenera SKYnyx 2-0M CCD camera January 19, 2011, at 12h40m UT, from Flackwell Heath, England.
David Tyler
Solar and lunar work
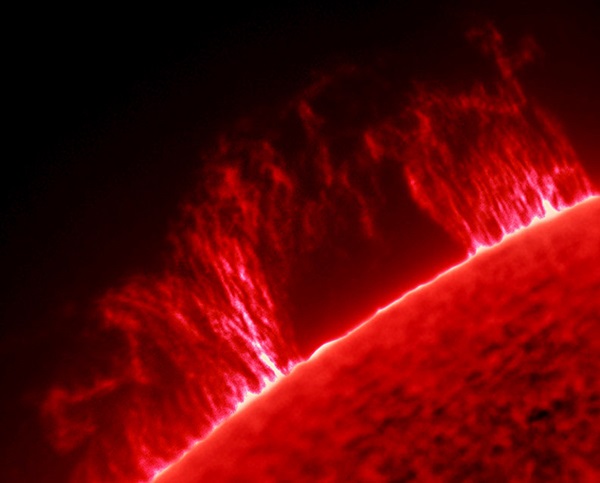
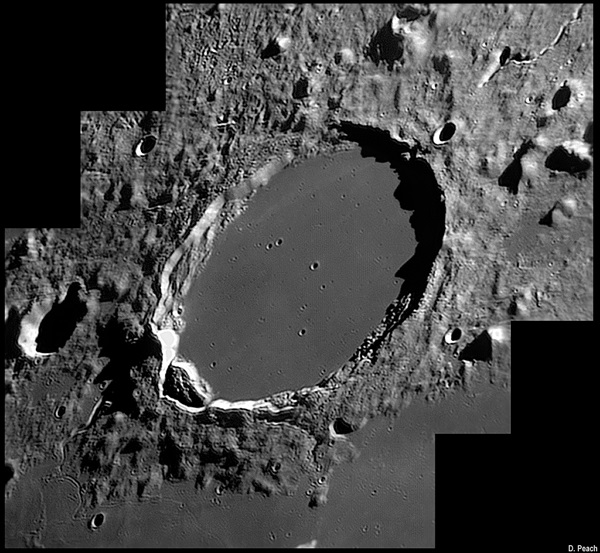
Imaging small areas of the Moon is just like planetary work except that you can use RegiStax in multi-point mode to counteract the stretching and distortion caused by bad seeing. Imaging sunspots is like imaging lunar craters except that, of course, you need an approved solar filter in front of the telescope, and lunar-rate tracking is not needed.

Full-face views of the Moon, the Sun, or eclipses of either are an entirely different game. Instead of a video astrocamera, you will want a digital single-lens reflex camera — preferably one that will let you start the exposure electronically during live focusing so there is no shutter vibration. Canon calls this feature “Silent Shooting” during “Live View” and offers it on many newer models. Alternatively, if you have time and patience, you can cover the full face of the Moon using a mosaic of separate video images.
The Sun, the Moon, and the visible planets offer bright, detailed targets for amateur astronomers — in essence, a wonderful and rewarding introduction to astrophotography.