One of the ironies of deep-sky imaging is that stars are generally not the stars of the show. Of course, there are exceptions with targets like open clusters. But for nebulae and other objects, the presence of these bright points of light in an image can hinder an astroimager from teasing out details.
Image-processing programs like PixInsight by Pleiades Astrophoto and Adobe Photoshop have offered methods to remove stars from images — but they can be labor intensive and yield mixed results. Two new, cutting-edge tools make it much easier.
The programs StarNet and StarXTerminator were developed independently, but both use a form of artificial intelligence (AI): neural networks trained to recognize stars and remove them from astroimages. The freeware StarNet can be used within PixInsight or as a standalone tool; StarXTerminator can be used as a plug-in with PixInsight and Photoshop, but requires users to purchase a license.
After using them, the target objects in your image can be manipulated without concern for those pesky stars. When processing is complete, the stars can easily be placed back into the image if the imager desires. Or, the stars can be left out for a dramatic display of isolated nebulosity — an especially popular look with narrowband images.
The problem
For an astroimager, stars present unique challenges. While faint deep-sky objects benefit from long exposures, brighter stars can quickly saturate a sensor, resulting in colorless and unnatural-looking orbs. You may find that a good compromise is taking shorter exposures, but more of them.
The same issue rears its head when processing an image. When a raw image file is imported to your computer, it is in a linear state, meaning that the brightness values from pixel to pixel are the same as when they were recorded by the camera. This typically yields a dark-looking image with little contrast. The pixel values must be nonlinearly stretched (brightened) to reveal what’s hiding in its initial linear state. Because many stars are already bright, stretching the dimmer parts of an image can damage the stars in the same way as overexposing them, and care should be taken to avoid this.
Because stars can’t be stretched far — and also because they don’t require the same amount of attention and processing as the faint, delicate features of a nebula — one approach to dealing with them is to mask them out. This is like a housepainter using tape to shield areas from a new color. Likewise, applying a virtual mask to an image protects specific elements (e.g., stars) so that adjustments such as noise reduction and sharpening don’t adversely affect them.
While masks do this rather well, making them takes time and requires some level of expertise to get them right. It’s easy to overlook objects or introduce unwanted artifacts. And while PixInsight, the dedicated astroimage-processing program, has built-in capabilities to create a star mask, the more general-purpose Photoshop does not. But thanks to the power of neural networks, StarNet and StarXTerminator make star removal as easy as clicking a button.
StarNet
StarNet began its life in 2019 as a script called StarNet++ written for PixInsight by Nikita Misiura. It was featured in PixInsight’s Script menu, which contains many free third-party plug-ins. While the original version did a commendable job of removing stars, it took a rather long time to run and left some star artifacts behind.
Despite these minor shortcomings, PixInsight’s developer, Pleiades Astrophoto, embraced the tool. The company converted the plug-in from JavaScript to C++, the same language as PixInsight’s main processes, and incorporated it as a native tool in the main Process menu, where it is now called StarNet.
The primary reason for the less-than-perfect performance from StarNet++’s original algorithm was a lack of training of the neural network. The key to machine learning is training algorithms on vast, varied quantities of data. The appearance of stars can vary greatly in brightness and shape, including halos and diffraction spikes. While the human brain knows that all these variants are stars, a neural network must be taught to recognize them.
Misiura’s original algorithm was trained using only data taken with his modest imaging system. And when he first released StarNet++, he was completing postdoctoral work in data science, leaving little time for improving the program. In early 2022, however, Misiura released StarNet2, a vastly improved version of the original process. (At the time of this writing, it has not yet replaced StarNet 1.0 in the PixInsight general release, but should be included in a future revision.)
StarNet2 is available for free at www.starnetastro.com and can be installed to the current version of PixInsight. There’s also a standalone version that can be run from a command line or graphical user interface on Windows, MacOS, and Linux.
While it’s recommended that stars be removed early in the workflow, I usually make some basic corrections to the data before applying StarNet2. A representative workflow might include the elimination of light gradients, color correction, linear noise reduction, delinearization (nonlinear stretching), and a touch more noise reduction after the stretch. In PixInsight, tools to accomplish these tasks might be DynamicBackground Extraction, ColorCalibration, MultiscaleLinearTransform, MaskedStretch, and TGVDenoise, respectively.
When processing data from a color camera (one-shot color, DSLR, or mirrorless), it is ideal to first apply a touch of color saturation with CurvesTransformation and then run StarNet2. If working with monochromatic data that includes luminance, it makes sense to wait until the luminance data have been combined with the color image using LRGBCombination — in this way, star removal need only be done once.
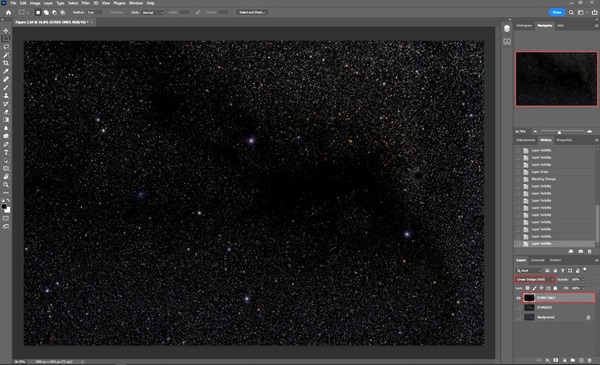
StarNet2’s interface is simple but has a few options. Leave the Stride setting at the default of 256. If you intend to replace the stars after processing the starless image, choose “Create starmask.” This is a bit of a misnomer — the image produced isn’t a mask at all, but rather the stars themselves (shown in step 2 below).
Misiura states that some “tight and bright” stars can produce artifacts, and the “2x upsample” option, which upsamples the image before star removal, is designed to alleviate them. In my tests, I felt this was unnecessary.
I don’t recommend using the last option, “Linear data.” This internally delinearizes a linear image, then removes the stars before unstretching the image back again. Best practice is to use an image that has already been delinearized with MaskedStretch, as described above, or with HistogramTransformation.
After running the plug-in and isolating the nebulosity, you can massage fine details via PixInsight’s full array of tools with no risk of blowing out the stars.
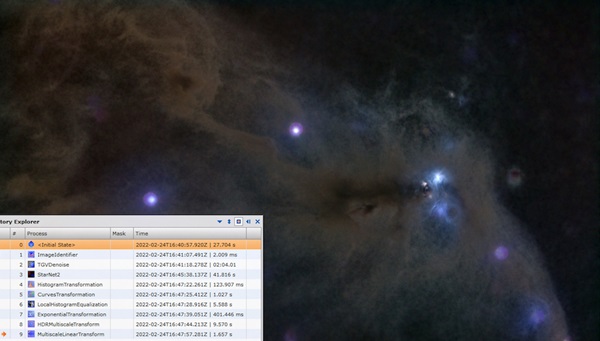
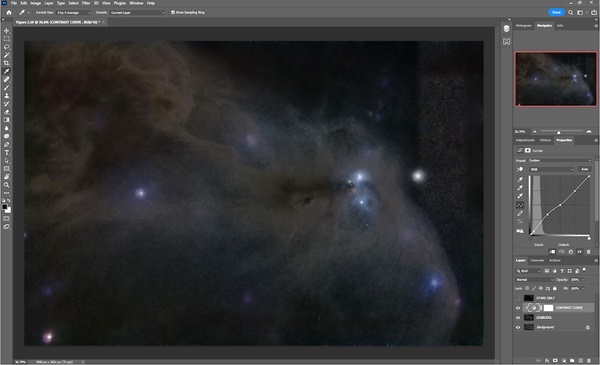
Step 3 below demonstrates how well StarNet2 performs on an image filled with thousands of tiny stars. The result has also been enhanced with the processes visible in the History Explorer: HistogramTransformation and ExponentialTransformation to brighten the image, CurvesTransformation for enhancing color saturation, LocalHistogramEqualization for boosting contrast, MultiscaleLinearTransform for sharpening, and HDRMultiscaleTransform for bringing out the detail in the cores of the nebula by compressing their brightness. Of course, there is rarely one way of skinning the proverbial cat, and a similar result could be achieved with a different mix of available tools.
Once you are satisfied with the development of the nebula, it is time to replace the stars. You can also make mild adjustments to the image that contains the stars — like tweaking color saturation — before reuniting it with the main image. Using the settings shown in Step 4 below, apply PixelMath to the starless image if you wish to put the stars back in. You could also try reducing the star contribution by multiplying the star-mask image by a number less than 1 (e.g., starless + 0.75*star_mask).
How to separate stars from images in PixInsight
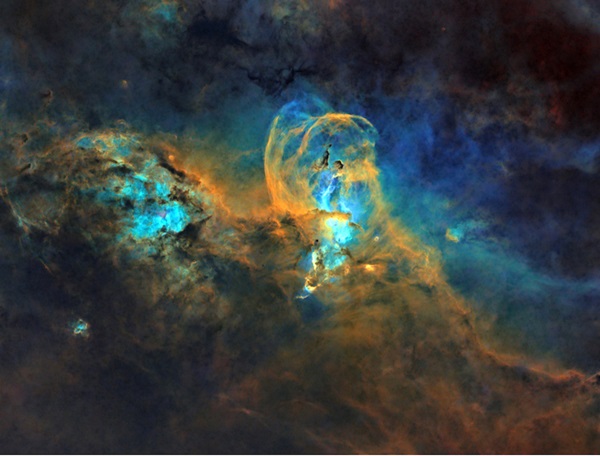
Step 1: The R Coronae Australis complex is one of the closest star-forming regions, at a distance of only 420 light-years. It features delicate reflection and dark nebulae that are easier to process with stars removed.
Step 2: StarNet2 does an impressive job of isolating stars. The “starmask” image that StarNet2 produces is not a mask, but the stars themselves. The options box is at upper left.
Step 3: The starless image can be processed without fear of damaging stars.
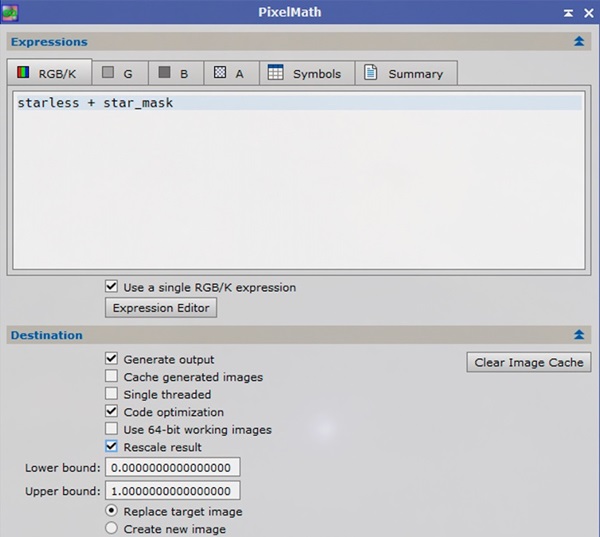
Step 4: Use these options to recombine the stars with the starless image. Try experimenting with different factors for the stars image.
StarXTerminator
As StarNet2 is free and does a great job, imagers whose main workflow is in PixInsight may not need anything more for star removal. However, for imagers who prefer working in Photoshop, Russell Croman of RC Astro offers an attractive solution in the payware tool StarXTerminator. (StarXTerminator does also work with PixInsight.)
A highly accomplished silicon chip designer, Croman has been involved in astrophotography for decades as an imager and author of some very useful Photoshop plug-ins, like GradientXTerminator and StarShrink.
StarXTerminator debuted in September 2021 and picked up where StarNet 1.0 left off, using its own unique neural network and a variety of training data that Croman had produced with different imaging systems over his decades in the hobby. As a result, StarXTerminator’s star-removing ability is superior to the original version of StarNet and on par with StarNet2. Some extended stellar elements such as large halos may be better handled by one or the other utility, but overall, both tools perform brilliantly.
After purchasing or downloading the free trial of StarXTerminator, the files must be placed in Photoshop’s Plug-ins folder per the instructions in the included PDF file. After opening the plug-in within Photoshop’s Filter menu and entering the license key sent by email, you’ll need to download the latest version of the neural network by clicking “Download AI.” With each revision, the neural network is trained further with data from different optical systems, making the program better at recognizing stars of all shapes and sizes and preventing damage to nonstellar structures. As of this writing, version 11 has been released, trained on a dataset including images from the Hubble and James Webb space telescopes.
StarXTerminator is available as a plug-in for PixInsight and Photoshop for $59.95. Its universal license key works for Windows, MacOS, and Linux operating systems. A free 30-day trial is available at www.rc-astro.com/resources/StarXTerminator.
If you intend for your final image to be starless, using StarXTerminator in Photoshop couldn’t be simpler — just apply the tool directly to the image. However, if you intend to blend the stars back in later, you can generate a Photoshop project with isolated stars and nebulosity in just a few steps.
As Photoshop cannot open FITS files or PixInsight’s XISF format, begin with a 16-bit TIFF file. Start processing by duplicating the background layer twice. From the Filter menu, run StarXTerminator on the top layer. Duplicate this layer, then make the duplicate invisible by toggling its tiny eyeball icon. Set the lower, original starless layer’s blend mode to Subtract, then merge this layer with the one below it using the keyboard command Ctrl+E or the Merge Down command in the Layers panel menu. This is now the layer containing the stars alone. Drag it to the top and set the blend mode to “Linear Dodge (add).”
How to separate stars from images in Photoshop
Step 1: After running StarXTerminator in Photoshop to generate a starless layer, you can produce the inverse — a layer with only the stars — by blending a duplicate starless layer in subtraction mode with the original background layer.
Step 2: You can then turn the stars layer on or off with the visibility toggle in the Layers panel. A simple curves adjustment to boost the shadows can enhance the nebula’s detail.
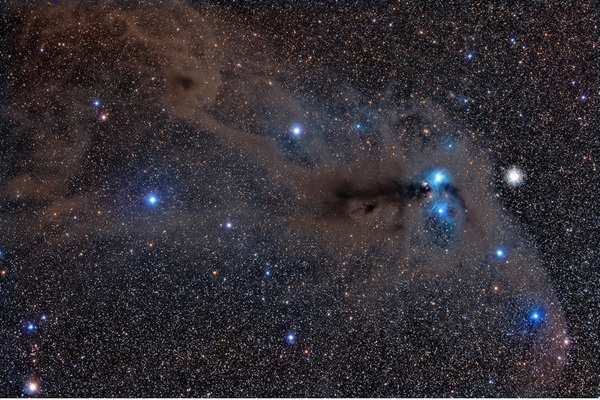
Step 3: Being able to process stars and the nebula separately can yield spectacular results.
You should now have three layers: the original photograph, the starless version, and the stars themselves. To work on the starless layer, activate it by clicking on it and be sure that the eyeball icon is on. You may wish to temporarily turn off the star layer to better see what you’re doing (step 2 above).
With stars out of the picture, the nebula or galaxy in the middle layer can be enhanced in a variety of ways. In step 2 above, a Curves adjustment is applied to significantly boost the nebula’s brightness and contrast. When processing is complete, you can flatten the layers. Whether to include the stars — as in step 3 above — or not is your choice!
The techniques outlined here harness the power of AI, yet leave all the creative decisions in your hands. Even if the dramatic look of starless skyscapes does not appeal to you, these star-removal tools can give you much more control over your final images.