First, let me describe my own setup. I use a Meade Pictor 1616XTE CCD camera, a 5-inch Meade apochromatic refractor, and Coronado Instruments’ 90mm SolarMax H-alpha filter. (The SolarMax actually has two components — the H-alpha etalon filter that attaches to the objective with a tip-tilt adapter ring and a blocking filter (I used the BF 30) that receives a 2-inch eyepiece.) A flip mirror on my CCD camera is parfocal to a CCD chip and attaches to both an observing eyepiece and a Nikon telextender that doubles the focal length to 90 inches at f/25. A dial gauge butted up to the CCD camera measures the position of the rack and pinion focuser, and a simple plastic drinking straw adjusts the length of the dial gauge’s plunger for different cameras.
To protect both your vision and your telescope, make sure the finder is capped and the solar filter is secure before you look at the sun. To control the camera and snap images, I use Diffraction Limited’s MaxIm DL software. I examine the images for focus and contrast and, if necessary, adjust the Ha contrast by tipping the filter using the adapter at the etalon’s base, dialing the adjustable ring of the BF-30, or rotating the etalon. Monitor the dial gauge to determine if the rack and pinion is set for best focus.
I take about 30 images of sunspots and prominences, which I tile across the screen to pick out the six or eight best. In MaxIm DL:
1. Click on the Window pull-down menu and select tile vertical or tile horizontal to display all the images on the screen simultaneously.
2. Choose the raw images best representing the day’s solar activity and save them as FITS files under the current date. They can then be retrieved for processing.
In preparation for processing, you should:
1. Open the file containing your raw image.
2. Under filter options, select digital development from the drop-down menu.
3. Select FFT (Fast Fourier Transform) and slide the level indicator to hard process.
4. Use the histogram to enhance the disk detail.
5. Save the image using 8-bit screen stretch and TIFF format. (Note: If you are processing prominences, you should repeat this FFT twice more to bring out the prominence detail.)
6. Adjust the histogram to best display the detail.
7. Save as a separate file. You should now have two versions of the same solar image — one with the best disk detail and the other with the best prominence.
My mainstay for digital processing is Adobe Photoshop. What follows is a step-by-step guide to processing an image with the software, developed after thousands of solar images and hundreds of hours of trial and error. I have touched on only what works for my system and camera. There are many other ways to accomplish similar results using a variety of image processing programs.
1. Open the disk image.
2. Select filter from the menu. Choose noise and then despeckle (this removes any fine dots in the image).
3. Again select filter from the menu. Choose sharpen and then unsharp mask. Set the amount to 100 percent, radius 3.5, and threshold 0. Click OK.
4. Select image from the menu and choose duplicate. Click OK. Repeat. You will now have three copies of the same image on the screen to colorize.
5. Select window from the menu choice. Choose channels.
6. Click on the small triangle within the circular button on the right. A pop-up menu will appear. Select merge channels. In the merge channel box that opens, under mode, choose multi channel and select RGB (Red, Green, Blue) Color. Click OK. Merge RGB channels.
7. Check to make sure the RGB has three versions (the original, copy, and copy 2). Click OK.
8. The resulting untitled image is in color, but will look black and white because it is equal parts red, green, and blue.
9. To colorize, choose adjustments from the image menu, then select levels. A histogram will pop up, defaulting to the choice of RGB in the window next to the word Channel. Scroll down through your choices until you come to the blue image. Select it.
10. Click and hold the triangle in the middle of the histogram and slide it all the way to the right. Release the mouse. The image will appear yellow/green. Now select the green channel by re-clicking the triangle on the right side of the channel box that highlights the color.
11. On the pop-up menu, select green. Again select the middle triangle in the histogram with the mouse and this time move it to the right until the color is light red. (At this point, personal preferences come into play. Select RGB and choose the middle triangle below the histogram. Slide it to the left to brighten the image.)
12. Select filter at the top and click unsharp mask in the drop-down menu. Go back to image and select adjustments.
13. Click on brightness and contrast. Move the contrast to around +14 or to your own preference.
If you are imaging only sunspots, the process is finished and you can print your image. To create a combined solar disk and prominence image, repeat the above process, this time using the image of the prominence and an overexposed disk. You will have two color images of the Sun — one with surface detail and one with prominences.
1. In the PhotoShop toolbox, select the wand tool.
2. Click on the edge of the sun in the disk image. This should surround the disk with a dotted line. A tolerance button at the top can be adjusted to change the amount that the wand picks up. A little practice may be required. I would set the value at 33 and increase the number if necessary for the wand to capture the entire edge.
3. With the dotted line in place around the sun, click on select at the top of windows. In the drop-down menu, choose feather, and set the feather radius to 5. Click OK.
4. Select windows again and then edit. Click on copy.
5. Select the prominence image and go to edit and paste. The disk will appear on the prominence image.
6. Select the move tool in the toolbox. Click on the solar disk image with the mouse and drag it into position. When you have it is nearly there, switch to the arrow keys and make the final adjustment.
7. To combine the two images, select layer. On the drop-down menu, select merge layers or flatten image and the images will be combined.
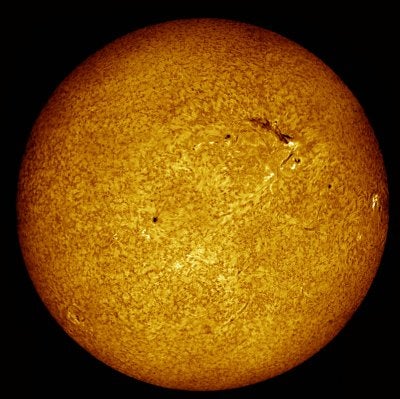
The sun is an incredibly dynamic object offering spectacular viewing and photographic opportunities. Since I started using an H-alpha filter, I have relished observing in the warmth of day. I wish the same enjoyment for you.