The digital single lens reflex camera (DSLR) has replaced the film cameras I used in my youth. I recommend this type of camera mainly because it allows you to change the lens. If you do not own a DSLR, you can purchase a good-quality entry-level one for under $1,000. Sometimes you can catch deals on used or refurbished models that will cost you much less. These cameras might not have all the features you might desire, but they will get you started. Do some research to determine which camera brand and manufacturer you want to build your photographic platform.
During your search, you will discover that the camera body is only part of the investment. High-quality DSLR lenses can cost as much or more than a medium-priced DSLR. Unfortunately, the major brands and manufacturers use different lens mounts. When I started the switch from film to digital some 16 years ago, I decided to go with Canon. I liked the company’s camera body innovations and the design and quality of its lenses.
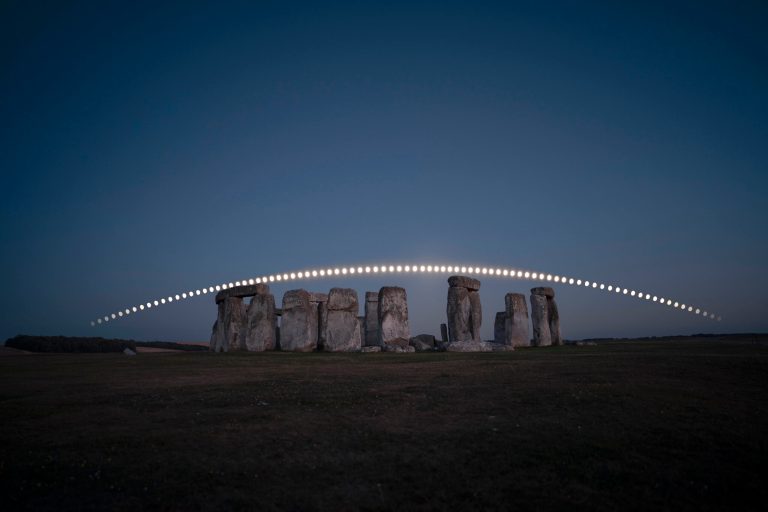
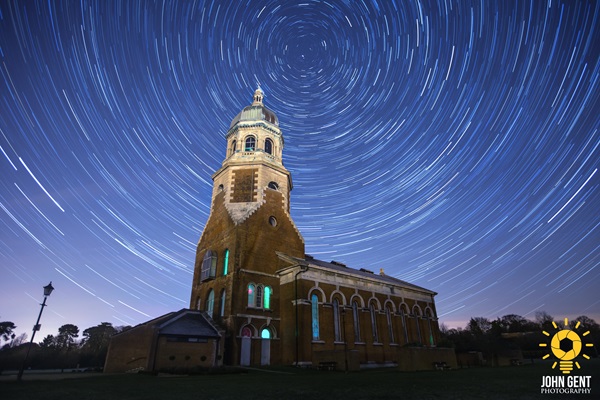
For star trail photography, you don’t need a telescope. A regular lens with a focal length around 50mm will suffice. I use a couple of Canon zoom lenses, and I choose between them depending on the length of the exposure and the subject. If I want to capture a wide field, I use a 16–35mm zoom. When I’m shooting actual star trails, the short focal length and wide angle provide wonderful images of curved star arcs as they rotate around Polaris. My other lens is a 24–105mm zoom. With it, the longest focal length I generally use for star trails is around 80mm. A longer focal length creates too many issues with star trails for my liking. When I photograph other subjects, however, I generally take many exposures encompassing a wide range of focal lengths. I pick the one I like best later.

Just like when you use a telescope, you will need a solid base to prevent any shaking during imaging. I use a standard metal tripod with extendable legs and a ball (swivel) head. I also often use a carbon-fiber tripod, which is lighter, yet still provides the stability my shots require. You can use either a pan-tilt head or a ball head, your preference.
Here’s an important tip that can increase your tripod’s stability: If I am in doubt about it, especially when I travel with a lighter tripod, I add a weight in the tripod’s center. I’ve found that an empty gallon milk jug filled with water, sand, or gravel works great, but I have friends who use a 10-pound weight from a barbell set, a small anvil, a large sack of pennies, and other solutions.
Make sure you can securely lock the tripod’s extendable legs — not only the leg extensions, but also any spread adjustment the legs will allow. Sometimes a taller tripod is not advantageous; there is more chance of introducing vibrations in the system. Yet you want to be comfortable as you frame and take your exposures, so set it at the height that works best for you, or don’t extend it and image while sitting.
Exposure times
Finally, you need the ability to control the length of your exposure. Technically, the device you want is an intervalometer. Canon refers to this as its Timer/Remote Controller, TC-80N3. This is compatible with all Canon DSLRs except the Rebel series.
Regardless of the camera brand and model you use, the intervalometer allows you to set the length of each exposure when your camera is set to “Bulb” on some DSLRs or “Manual” on others. With most intervalometers you also can set the amount of time before the first exposure begins, the time between exposures, and the number of exposures. Also note that most intervalometers, though well constructed, connect via a cable, and that cable can be damaged. I used my first TC-80N3 so much that the cable’s connection to the unit itself became frayed. Now that’s a lot of imaging!
Other types of intervalometers are available, including wireless devices. Just make certain the one you purchase is compatible with your camera, and that it lets you easily take long exposures. You do not want to be sitting or standing there, holding some remote button for 30 minutes!
Other considerations
Probably the most important point after equipment selection is that you will need to focus manually; do not engage the lens’ autofocus feature. If you do, the lens will search for infinity and never find it. To manually focus, look for the infinity mark (∞) on your lens. On Canon models, look for what looks like an L before infinity. It is crucial that you check focus. Take test shots and get it right. Once you figure out where to set your lens for sharp stars, you can mark it to signify infinity. I’ve added a small but nice-looking label to the lens showing exactly where infinity is. I still re-check the focus every time I image, but at least I have a starting point.

You have the option to determine your camera’s level of sensitivity to the available light through the ISO (also known as ASA). These designations go back to the days of film and established standards. You might think that the higher the ISO, the better, especially with stars as faint objects. Not so fast. Yes, a higher ISO means greater light sensitivity. But along with it comes additional electronic noise, seen on your exposures as small specks that are not stars.
You must find a balance between ISO settings and noise. My Canon EOS 80D has a feature called “Native ISO,” resulting in less noise when compared with other similar ISO settings. Generally I image at around 320 ISO. I might push it to 640 or even 1280. Experiment with your camera by taking exposures using varying ISO settings.
You can purchase modified DSLRs that include a camera cooler. It lowers the camera sensor’s temperature, thus reducing the noise. However, these modified cameras are more expensive. Think of this as something you might want to look into if you step up to taking images through a telescope. Also, keep in mind that usually you can’t use such modified DSLRs for anything but astroimaging.
Two other considerations of star trail imaging are the camera’s lens aperture and shutter speed. As you set the aperture, you change the lens opening, which allows more or less light onto the sensor, much like the pupil in your eye. The smaller the f/number, like f/1.4, the larger the aperture and the more light that strikes the sensor.
So why would you even want a smaller aperture? It has to do with having everything in your photo in focus, called depth of field. This is important for regular photography, but not star trails, so open the aperture as large as possible.

Some people thinking of imaging star trails on a regular basis will purchase a fast lens, like the Canon 50mm f/1.4. Even better would be a 50 mm f/1.2 lens. Unfortunately, the difference in retail pricing between these two lenses is about $1,000. And while you can load your camera case with fixed-aperture lenses, many photographers (me included) choose to purchase one or two high-quality zoom lenses instead.
Regarding shutter speed, we are taking long exposures — seconds to minutes. You have a couple of choices: a single long exposure or a number of short exposures that you later stack using image-processing software. Each has advantages and disadvantages.
For the novice unfamiliar with software, start with single exposures. However, taking one long exposure can lead to issues, like unwanted exposure to light by something like a passing car, capturing an airplane’s light trail, or even you bumping the camera or tripod.
If you’re familiar with image-processing software, taking a series of shorter images and later stacking them as one image is an attractive option. This alternative lessens the seriousness of bad exposures. Because you haven’t invested a great deal of time in any one of them, tossing out the bad ones becomes easier.
If you stack a series of exposures to create a star trail, you might end up with small gaps between each one. Let’s say you take 30 three-minute exposures for a total of 90 minutes. You start the first exposure, stop it, and then take the next one. Here’s where an intervalometer really comes in handy: You can set the length of time to be quite small between each exposure. Note that when you’re doing this manually, even if it’s only a few seconds between each star trail you take, you could end up with a gap, depending on the focal length of the lens. This becomes more problematic with the longer focal lengths, especially toward the top of the range I usually use, 80mm.
One attractive alternative is combining both: Take one short exposure, break for a couple of seconds, then a long exposure. Your final stacked photograph will show stars exposed for the shorter time as star-like. The trails, then, will be longer arcs.

Be creative! For example, if I’m trying to photograph meteors, I prefer to place a terrestrial object such as a tree, some landscape, or even a man-made object in the foreground. This makes for a more compelling result. When I image with a tree, I put it about 10 to 30 feet (3 to 9 meters) from my camera, depending on the size of the tree, of course. I have also used white and red flashlights to illuminate foreground objects during exposures. I don’t use the light constantly; it’s more like I’m brushing the object with the flashlight. The Moon setting behind you (opposite your target) can also light the foreground object. Just know bright moonlight can wash out your sky and provide too much additional lighting.
I have also imaged sections of sky with a telescope in the foreground. I don’t light the scope; I just let it eclipse that part of the sky. And people work well here, too. They just need to be still while you image.
As you master star trail photography, look for other challenges. One of these could be mounting your camera on a small equatorial mount that compensates for Earth’s rotation. You’ll then essentially be creating your own star maps. Here, the techniques above, such as focusing, using the intervalometer, and setting a correct ISO, will play a big role in your success.
Star trails were my first trip down the path of astroimaging. From there I built my own cold camera, machined a device to hold film in a container with specific gases to increase its sensitivity, and experimented with all types of film emulsions. Yet in a relatively short period of time, those often-difficult techniques have become things of the past. With the tools and techniques now available, you can begin your journey by taking star trail shots that would have been considered works of art when I began imaging all those years ago. So pick up your camera, head outside, and start your journey.