From the March 2015 issue

Black paper

Celestial sketcher Erika Rix explains the advantages of using black paper to create sketches of astronomical objects.
By | Published: March 30, 2015 | Last updated on May 18, 2023
Erika-Rix
Let’s face it, white printer paper is inexpensive and readily available in packs of 500. I confess it’s my “go to” for most deep-sky sketches. But be aware that there are a slew of alternatives, most with unique qualities that could help you achieve better results. Think of textures, tints, weights, and sizes. Now imagine the many possibilities. One of my favorites is black paper, specifically the rich tone and fine tooth of brands like Strathmore 400 Series Artagain and Daler-Rowney Canford. Their ability to accept mixed media allows versatility.

In my case, I use color pastels and pencils with them for planet sketches. A few other advantages I’ve found include: 1) the light texture of the paper will help you create the mottled appearance of the Sun’s chromosphere; 2) you can produce star fields and deep-sky objects in a positive format (white on black, as they appear through the eyepiece); and 3) with practice, you even can draw the rugged terrain along the Moon’s terminator with ease.

Western edge of Mare Crisium
For this sketch of the western edge of Mare Crisium along the terminator, the author viewed through a 6-inch Ritchey-Chretien reflector at f/9 with an 8-24mm zoom eyepiece for a magnification of 171x on September 4, 2012, between 3h30m and 6h15m UT. She used 9-inch by 12-inch black Strathmore Artagain 160 gsm paper, a white Conte crayon, a pastel pencil, a black Derwent watercolor pencil, black charcoal, a black oil pencil, a 3/16″ tortillon, and a 1/4″ blending stump.
Erika Rix
I offer the first sketch as an example. I used a 9-inch by 12-inch sheet of Strathmore paper to sketch the western rim of the Moon’s Mare Crisium. Mountainous areas, like those that surround the lunar basin, are particularly challenging when they lie close to the terminator. The scene’s lighting also changes rapidly, so time is of the essence.

Rather than using white paper, where you must first outline and then fill in the shadows, save time instead by drawing the lighter areas on black paper with a white pencil. The shadows will form automatically, and before you realize it, you’ve successfully sketched a complex region! I then completed the remainder of the sketch more leisurely with a mixture of media.

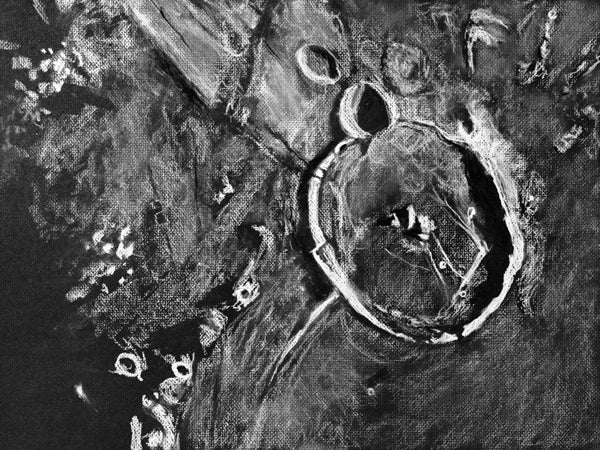
For the second sketch, Richard Handy chose an 18-inch by 24-inch sheet of textured black Conté paper to create a sketch of the crater Gassendi and its surroundings. Using broad strokes with a stick of Conté crayon (chalk) and light blending, Handy took advantage of the paper’s heavy tooth to produce albedo variances (differences in reflectivity). The larger paper size let him add intricate details, as shown by Gassendi’s complex rille system and central peaks.

Gassendi Crater
Richard Handy made this sketch of Gassendi Crater on September 3, 2006, between 4h20m and 5h56m UT through a 12-inch Schmidt-Cassegrain telescope at f/10. He added a binoviewer with a 1.6x nosepiece and 20mm eyepieces for a magnification of 244x. He used 18-inch by 24-inch textured black Conte paper, white and black Conte crayons, and hard synthetic foam for blending.
Richard Handy
The difference between the two paper types is remarkable, and each has advantages. But there are more things to consider. What archival qualities does your choice have? How will it hold up in damp conditions? Can it hold media after an erasure? Will the drawing bleed or remain crisp?

Not all paper is created equal, so do a little research before you buy. A useful guide can be found on the Dick Blick Art Materials website at www.tinyurl.com/rixtip. In a future column, I’ll give tips on how to use black paper for deep-sky objects. In the mean time, have fun experimenting!